[text]
0. Introduction and setup
1. Most basic program to display a window
2. Change window size
3. Add a textbox
4. Add a label to a textbox
5. Form with three labels and three textboxes
6. Add a button to a form
7. Perform an action when a button is clicked
8. Read data from SQL database to textbox
9. Read multiple columns of data from SQL database to textboxes
10. Read data using a parametrized SQL query
11. Insert data into SQL database
12. Make textbox bigger
13. Add a tab to a form
14. Basic research and data entry tool
15. Add a menu to a form
16. Read data from text file
17. Save data from textbox to text file
18. Basic text editor
19. Display table/grid
20. Additional table/grid features
21. Read data from SQL to table/grid
22. Table/grid lookup tool
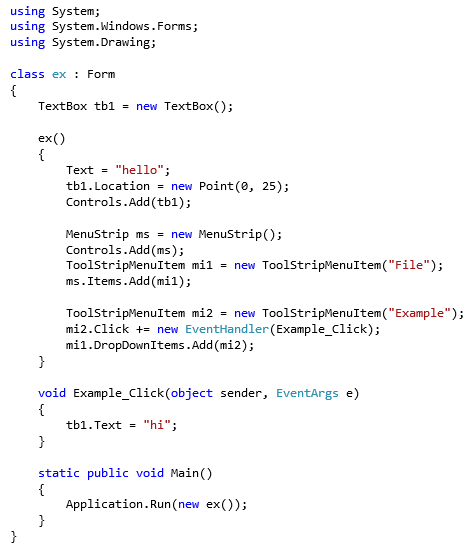
1. Most basic program to display a window
Result:

In C#, what many people might call a "window" is called a "form". The objects such as buttons, textboxes, and checkboxes that can be put on a form and allow you to interact with it are called ōcontrolsö.
In this example, we did not add any buttons, textboxes or other controls. (The "close", "minimize" and "maximize" buttons are automatically added when the form is created, though they can be excluded.)
The only customization we made to the form is to put the word "hello" on the title bar. This was done by putting "hello" in double quotes after the equal sign after the word "Text" in the middle of the program.
The name that we used for some of the parts in this example, "ex", (to stand for "example"), was arbitrary. "ex" could be change to another name based on the functionality of the form. So "ex" could be replaced with "Customer", or "frm" (to stand for "form"), or "Customer_frm", etc. To modify this program to use different names for some of the parts or to put a different word in the title bar, you would need to modify some or all of the four highlighted words in the following screenshot:

2. Change window size
To change the size of the width and height of a window, use "Width = number1" and "Height = number2", where "number1" is the desired width in pixels and "number2" is the desired height in pixels.
Result:

The above program with the newly added lines highlighted to show their location is:

3. Add a textbox
To add a textbox to the basic form in step 1, after the first "{" of ex 1, put ōTextBox textboxname = new TextBox();ö and then after "Text = "hello";", add "Controls.Add(textboxname);", where ōtextboxnameö is the desired name for the textbox. For example, using the name ōtb1ö for the textbox:
Result:

You can enter text into the textbox in this example, but beyond that, it doesnÆt do anything. Further functionality will be added as we go on.
The above program with the newly added lines highlighted to show their location is:

The first part, ōTextBox tb1 = new TextBox();ö, creates the textbox, the second part, "Controls.Add(tb1);", adds the textbox to the form.
4. Add a label to a textbox
Supposing we want to add some text beside our textbox to describe the contents of the textbox. A ōLabelö would be a place to put text that would tell the user what data the textbox holds. We canÆt just use ōLabel labelname = new Label();ö in the declarations and then ōControls.Add(labelname);ö. We also need to specify what the text is that will display on the label. This is done with ōlabelname.Text = ōtextö;ö. But, the following will still not work:
Result:

What appears to be happening is that it is putting both controls at the same place, so you can only see one.
One way to fix this is to change the location of the textbox. This is can be done by using ōtextboxname.Left = number1ö, where ōtextboxnameö is the name of the textbox and ōnumber1ö is the number of pixels from the left of the window.
Result:

With the changes highlighted:

Another way to change the location of the textbox is to use ōvariablename.Location = new Point(x,y);ö. ōLocationö is the coordinates of the top left of the control, where x is the horizontal offset (going right) and y is the vertical offset (going down). ōusing System.Drawing;ö will also need to be added at the top of the program.
Result:

Adding ōusing System.Drawing;ö is necessary to use the ōPointö functionality. Supposing ōusing System.Drawing;ö were removed, the following error would be received:

The example with with the newly added code highlighted is:

5. Form with three labels and three textboxes
Suppose we wanted to enter data into the textbox and have it send to a SQL database. Towards that end, letÆs make a form with three labels and three textboxes. (The following will give just a form with three labels and three textboxes. It will not yet send the data to a SQL database.)
Result:

6. Add a button to a form
To add a button to a form, use ōButton variablename = new Button();ö, ōvariablename.Text = ōtextö;ö, and ōControls.Add(variablename);ö The button displays and can be clicked, but when it is clicked it doesnÆt do anything.
Result:

If we also add ōusing System;ö, ōvariablename.Click += new EventHandler(functionname);ö and ōvoid functionname (object sender, EventArgs e) {code}ö, our button can perform an action. In the following example, "code" is "MessageBox.Show("example message");", which will show a message box that reads "example message".
Result (after the button is clicked):

Highlighting the newly added lines:

7. Add text to a textbox when a button is clicked
Towards retrieving data from a SQL database and saving it in a textbox, want to just add predetermined text to a textbox when a button is clicked. Supposing we want a label, a textbox, and a button, and want to add the text "example" when the button is clicked. To add the text to the TextBox when the button is clicked, add "tb1.Text = "example";" to the button click function (button_b1_click).
Result:

After the button is clicked:

Highlighting the change to the button click function:

8. Read data from SQL database to textbox
Suppose we have a Microsoft SQL Server localdb instance called "sql", with a database called ōexö, with a user named ōsample_userö, that has a password ōabcö. To set up download SQL server and set up the instance, see the link here. To set up the database on the instance:

then:
We need to add ōusing System.Data.SqlClient;ö towards the top of the program, and to the button click function, we need to add:

To explain the above; first, need to create an object to represent the connection to the SQL Server:

The list information inside the parentheses of SqlConnection() (containing the Data Source, User id, etc.) is called the connection string:

Next, open the connection:

Create the SQL command. "Select @@version" is a sample SQL query we can use for a simple program. It just tells which software version of the SQL Server is being used:

Send the command to the connection and create the SQL Data Reader object to read the data from SQL:

Read the next record of the SQL query results:

Next, need to copy the value from the SQL results to the form, in this case, to a textbox. The number inside the brackets of ōreader[]ö tells which column of the SQL record to copy, starting with 0 for the first column and going up by one. In this, case, we only have one column in the SQL query results, the the number in the brackets will be 0.

Close the connection:

The full program will be:
Result:

After the button is clicked:

Full program with changes highlighted:

Note that this example, due to having the SQL password saved in the .cs file, can present a security issue depending on the context. It is presented just to show the basic functionality. Additional steps can be taken to secure the SQL password. See this link for more information (this is a link to Microsoft documentation for the JDBC driver, which is a way to connect to SQL server with the Java programming language (Java is a programming language that is somewhat similar to C#). Even though it is for a different programming language, the same principles apply to using an unencrypted password in a code file).
Depending on the context, there is another way to write the connection string. If the userÆs permissions for the SQL Server is the same as their Windows login, the UserID and Password can be replaced with ōIntegrated Security=trueö. The SqlConnection is then created with the following:
For more information about Integrated Security, see the following link (again, the Microsoft documentation in this link isnÆt exactly in the context of using C# with SQL Server, but the same principles apply).
If you are using a SQL Server administered by someone else, but your permissions for the server are linked to your Windows login, then you should be able to use Integrated Security to access the SQL Server. Then, if someone else were to use the program you made using ōIntegrated Security=trueö, the queries in the program would work for them if their Windows login had the same permissions on the SQL Server that you did. If they lack a permission you have, then the associated query would fail for them even though it would work for you.
Full program with Integrated Security connection string:
As an additional note, if you only want to return a single value, as in this example, you can use ōcommand.ExecuteScalarö instead of ōcommand.ExecuteReaderö (and then write "tb1.Text = command.ExecuteScalar().ToString()"), I suppose based on this Stack Overflow answer that it is slightly faster, which would make a difference in a program that needed to make many SQL queries. For simplicity of this tutorial, "ExecuteReader" is just shown here as it will be used in subsequent steps for multiple columns and rows. [text]
9. Read multiple columns of data from SQL database to textboxes
Using database ōexö created in step 7, create a table with three columns and insert some sample data:
Then use:
Result:

After clicking the button:

The changes made to the button click function of the code were:

We see values ō1ö and ō2ö in the brackets of ōreader[]ö because we now have three columns, and as mentioned above, the number in the brackets refers to the column number of the results, starting with zero for the first column.
Note that the ō+ö symbol is necessary to continue the SQL query part of the code onto separate lines, but the plus sign is not required to continue a typical line of code itself onto another line, i.e. after the ōSqlCommand(ō part.

Note also that the column of data to be read with ōreader[]ö can be specified with the column name in addition to the column number:

As an additional note, if you only want to return a single row of data, as in this example, you can put "System.Data.CommandBehavior.SingleRow" inside of the parentheses of ExecuteReader(), as in ōcommand.ExecuteReader(System.Data.CommandBehavior.SingleRow)ö, I suppose based on this Microsoft documentation that it is slightly faster, which would make a difference in a program that needed to make many SQL queries. For simplicity of this tutorial, "ExecuteReader()" is just shown here as it will be used in subsequent steps for multiple columns and rows. [text]
10. Read data using a parametrized SQL query
Next we will show how to use parameters with a SQL query by writing something similar to the previous example using a parameter. In the previous example, we had a hard-coded value of ō3ö, and could only look up CustomerID 3. But in a more realistic example, we may want the user to be able to type in a CustomerID, and then have the program look up that Customer and return their information. Within the SQL query can use ō@0ö to represent the CustomerID, and then add a line of code

to tell the SQL query to use the value that is in Text Box ōtb1ö in place of the ō@0ö when the query is run. The ō0ö in ō@0ö is called the parameter. If using multiple parameters, you would continue with using ō@1ö, ō@2ö, etc.
The full code to be put inside of the button_b1_click function is:

Note that ōCustomerIDö can be removed from the ōselectö part of the SQL query and ōtb1.Text = reader[0].ToString();ö can be removed since we now already have the CustomerID in ōtb1ö and would just be overwriting the value with itself. Because we remove CustomerID from the query, we need to change the value in ōreader[]ö for ōtb2ö and ōtb3ö. The button click function with changes highlighted is:

Full program is: [text]
You may wonder, why not just use ō+ö to combine the query with some value, say ōtb1.textö, as in the following:

This will provide the desired functionality as far as if you put a ō3ö in the ōCustomerIDö textbox it will return the associated information. But suppose you put ō3; drop table Customersö into the textbox:

A semi-colon separates sql statements, so if the program executed both statements, the second would delete the ōCustomerö table. In this example, it seems that ōExecuteReaderö is only executing the first statement, but from what I read, you should always use parameters. This idea of a user entering an unintended query is known as ōSQL Injectionö, and is an issue to know about for other cases. The Microsoft documentation on the issue is here.
Note that the above only works if you search for a CustomerID that is already in the table. If you search for a CustomerID that is not in the Customers table, you will receive an error:

The line:

can be updated to:

Full program is: [text]
11. Insert data into SQL database
Next, we will make a form with a button and when the button is clicked it will insert data into a table in a SQL database.

Full program is: [text]
Result:

If we type in a CustomerID and name:

If we go to SQL and run:

It gives:

Button click function with the changes from the first example of section 10 highlighted:

Further improvements that could be made to this program would be to check if a CustomerID already exists, and then if it does, not allow the user to enter that customer. Additionally, the program could be set up to only add a first name and last name, and then SQL would automatically include the next available CustomerID that hasn't been used yet.
12. Make textbox bigger
Can change the width of a textbox using "textboxname.Width = number".
Result:

This works with many controls, as does ".Height", which doesn't work with textboxes. See the following example with changing the size of a button:
Result:

To change the height of a textbox, need to also use ōtextboxname.Multiline = true;ö.
Result:

(Specifically, setting a textbox's "Multiline" property to "true" makes the textbox so you can type multiple lines of text into. You can leave a textbox the height of one line of text and enter multiple lines into it using only "textboxname.Multiline = true;" without changing its height, if you have that need. (Example [text].) But to change its height it requires ".Height" and ".Multiline = true".)
To make a textbox the size of the entire window, use ōtextboxname.Dock = DockStyle.Fill;ö in addition to ōtextboxname.Multiline = true;ö.
The ōDockö feature lets you attach a controlÆs particular edge towards a certain direction (top, bottom, left or right) of the form (or control) containing it, or has the option of ōFillö which expands the control to the entire available area. For more on Dock, see here.
Result:

13. Add a tab to a form
To add a tab to a form, there are two steps. First, you need to add a ōTab Controlö, which is just an object to hold tabs, and second, you add the tab (called a ōTab Pageö) to the Tab Control.
First, create the TabControl and TabPage:

Then add the Tab Control to the form

and then the Tab Page to the Tab Control

Tabs can be named with:

Final program is here:
Result:

To add an object to the tab page use ōtabname.Controls.Add(object)ö. For example the following program has two tabs, and adds a text box to the first tab and a button to the second tab:
Result:

14. Basic research and data entry tool
We can combine steps 10 and 11 together using the tabs from step 13 into a basic tool for research and data entry. There is one tab to look up customers using the CustomerID, and there is another tab to insert customers to a table.
Result will be:


Code is:


As an example of how the tool works, enter a Customer on the "Add" tab and then click "Add":

Then type the CustomerID on the "Lookup" tab and click the "Lookup" button:

The customer entered on the "Add" tab will now display:

15. Add a menu to a form
To add a menu to a form, first need to add a ōMenu Stripö, then ōMenu Itemsö to the Menu Strip. Menu Items added directly to the Menu Strip will be the top level choices that are visible at all times (like the typical ōFileö, ōEditö, ōViewö, ōOptionsö, etc. categories), and then Menu Items added to menu items will build out the options within those top-level categories.
Menu items added directly to the Menu Strip:
Menu items added to menu items:
To create a simple example, first create and add a Menu Strip:

Add a Menu Item to the Menu Strip:

Add a Menu Item to the Menu Item:

Add an action when a Menu Item is clicked:

and

Full program is:
Result:

When the button is clicked:

16. Read data from text file
To read data from a text file to a text box, use ōtextboxname.Text = File.ReadAllText(@ōfilepathö);ö, where ōfilepathö is the file path and file name of a text file, for example ōC:\test\test1.txtö:

Can create a text file using the built-in Windows program ōNotepadö. Notepad can be opened by searching ōNotepadö in the Start menu:

Gives:

Open Notepad, enter some sample text, and save with the desired filename in the desired location (for example, as ōtest1.txtö in ōC:\testö):

Sample program is:
Click ōFileö, and then ōOpenö, and then the ōtest1.txtö file should open:

To allow the user to select a file to open using a built-in Open File Dialog Box feature, use the following:

and also need to add ō[STAThread]ö above the line ōstatic public void Main()ö:

Full program is:
17. Save data from textbox to text file
To save text from a text box to a specific file, use ōFile.WriteAllText(@ōfilepathö, textboxname.Text);ö, where ōfilepathö is the file path and file name of a text file, for example ōC:\test\test1.txtö:
To use the built-in Save File Dialog Box, use the following, along with again adding ō[STAThread]ö:
This is similar to the open file dialog, but there is an additional line, "sfd.DefaultExt = "txt";", to specify a default file type to save as (in this example, ōtxtö).
18. Basic text editor
Combining the two previous examples into one, we have a basic text editor, which allows us to open a file, edit it, and then save it.
Result:

To give one example of where you can go from here, consider that you can change the font of a textbox using:

Sample program is:

Result:

19. Display table/grid
Suppose we wanted to display data for multiple records from a SQL table, say for multiple customers. If we wanted to display CustomerID, First Name, and Last Name for three customers, we could use textboxes as above, and use nine textboxes to display the data. However, as the number of textboxes increases, it becomes easier at some point to use a ōData Grid Viewö, which is a control that is useful for displaying a table/grid of data.
Suppose we wanted to display the data for the three customers entered into the Customer table in section 9:

Using a Data Grid View, we can create a program that displays the following:

First, create DataGridView

Make the window a little wider so we can see all of the data:

Like with other controls, can set the Height and Width of the DataGridView:

Specify the number of columns and rows for the Data Grid View

Add the Data Grid View to the form:

Next, add the titles for the columns of the Data Grid View:

Like with ōreader[]ö, the column numbers start with zero for the first column.
Fill out the data:

The numbering for Rows starts with zero as well. Each row has as many ōCellsö as the Data Grid View has columns. Many people are probably familiar with the ōCellö terminology from Excel, a Cell is just a field in a given Row where data can be input. Cells are numbered starting with zero as well, so ōRows[0].Cells[0]ö is the first cell in the first row, ōRows[0].Cells[1]ö is the second cell in the first row, etc.
Full program is:
20. Additional table/grid features
The default behavior is for a user to be able to edit the data in a DataGridView. (When they edit the data, it only affects the data for as long as the program is open. Even in the future section when we add the data from a SQL query, when the user edits the DataGridView, it wonÆt automatically update the SQL table. That behavior is possible to add, but it is not the default and beyond the scope of this tutorial.) To prevent the user from editing the data in the DataGridView, set the ōReadOnlyö property of the DataGridView to ōtrueö:

As the default, when a user edits the last row of data, a new row is added. To prevent the user from adding a new row, but still allow them to edit the data that is displayed, can use:

Can set the height for new rows using:

Note that it only sets the height for rows that havenÆt been added yet, and if you put it in the code after already adding rows, for example, by using ōdgv.RowCount = 3;ö, those rows will have a different height then any rows added after. For more information and an example, see here. Any single row can also have its height changed using ōdatagridviewname.Rows[number1].Height = number2ö:

Can set the DataGridViewÆs background color (ōColorö requires ōusing System.Drawing;ö):

Can set the color of the grid lines:

Can set the background color of the row headers:

Can change the border style of the row headers:

Full program is:
Result:

21. Read data from SQL to table/grid
Suppose we want to read data from SQL to a DataGridView. So far, we have only been returning one record of data from SQL. The following changes will allow us to return multiple records:
First, need to create a variable to represent the row number of the data. Any name for the variable can be chosen, but this example will use the name ōrwö.

Need to replace ōreader.Read()ö.

The ōwhileö keyword tells the program that as long as the condition inside the parentheses is true, want to execute the code that is inside the brackets. (To note, statements like ōwhileö that execute multiple times are known as ōloopsö, which makes sense and helps explain how it works, since execution of the code inside of the brackets starts at the top, continues to the last line before the brackets and then starts over at/"loops" back to the top):

Each time after the code inside the brackets is executed the condition inside the parentheses is checked again. When ōreader.Read()ö executes, it checks if there is another row of data to be read from SQL Server to the program, then reads the data, then returns ōtrueö to the program if another row of data was found, or ōfalseö otherwise. So if there is another row of data, the condition inside the parentheses will be true, and then the code inside the brackets will run.
For the code inside the brackets, first, will add another row to the DataGridView:

The next part says that for each column in the most recent row read from SQL, put the value for that column in the SQL row into the same column on the DataGridView:

ōrwö was set to zero earlier in the program, so the first time the previous code executes, it will fill out the data for row zero of the DataGridView. The next line of the code adds one to rw, so the next time the code inside the ōwhileö statement brackets runs, it will allow the part inside of the ōforö statement to point to the next row of the DataGridView:

Now, all of the code inside the brackets of the ōwhileö statement has executed, so the program moves back to the condition part of the ōwhileö statement, and checks ōreader.Read()ö again. If there is another row of data, the code inside the brackets of the ōwhileö statement will execute again. Another row will be added to the DataGridView by ōdgv.Rows.Add()ö, then this row will be populated by the ōRows[rw].Cells[number].Value = reader[number]ö lines, and then ōrwö will be increased by one (rw = rw + 1). Then the program will go back to check the condition of the ōwhileö statement again. When there are no more records in the SQL query results, ōreader.Read()ö will be false, the code inside of the ōwhileö statement will not run, the program will move on past the ōwhileö statement, and the next line of code ,ōconn.Close();ö, will run, and the program will continue from there.
Full program:
Result:

After clicking "return":

As an additional improvement, can add a row number to the rows of the DataGridView by putting the following inside of the ōwhileö loop:

Full program is: [text]
Result:

22. Table/grid lookup tool
Suppose in addition to the Customers table, we also had a table of orders placed by each customers. Suppose we wanted a program to view the orders placed by each customers:

Can set up the table using the following:
Need another table to link the Customers and Orders table together:
Need to know one new functionality, which is how to clear the data in a DataGridView:

Program is the following: [text]
Note that ōdgv.AllowUserToAddRows = false;ö appears to be required.
Can expand the Customer table slightly to show a slightly more useful example, one that shows more information above the Order table/grid:

To drop the existing Customer table, create an expanded version, and load sample data:
Program is: